Claustrophobia
Claustrophobia - fear of being in an enclosed spaceClaustrophobia invokes an opposite approach than most of the variants on this site. Instead of increasing the size of the board, it is cut down to a fraction of its original dimensions: a mere 5x8 board with 3 additional squares on each side - a total of 46 squares. These three squares constitute the palace, which initially holds the King, the Queen-Guard, and a Knight.
There exists an underlying logic in this seemingly bizarre start position. There is no castling for the king is already at a wing (in the palace), and the objective of the game is not just checkmate (which wins as usual), but to invade the palace of the opposing king with your king and capture the scepter. The scepter is located on the 3 squares of the palace, and can only be captured by the opposing king. The scepter must be protected at all cost for losing it forfeits the throne, power …everything.
The dual objectives and the new pieces are sure to make the game both challenging and stimulating.Board Setup
The standard chess pieces can be used to represent the new pieces.Queen=Queen-Guard
Bishop=Ninja Guard
Rook=Flying Bomber
 |
Start Position for white. (black mirrors white)
Flying Bombers on a1, b1 Knights on c1,g2 Ninja Guards on d1, e1 Queen Guard on f2 King on f1 |
Rules
The rules are as in orthodox chess except as noted below:- There is no castling as the king is already in its palace where it is normally safe.
- In addition to checkmate, a side can also win by capturing the opposing king's scepter.
Black's scepter is in the palace on f8,f7,or g7 and white's scepter on f1,f2,or g2.
Only the king can capture a scepter, so for example,if the white king marches towards the black king's palace, black can use this opportunity to checkmate, or drive the white king away and march the black king towards the opposing palace. - Pawns promote on the last rank to Queen-guard, ninja-guard,flying bomber or knight.
- The unused squares do not hinder the movement of any pieces.
- All rules governing draws including stalemate are exactly as in orthodox chess
The Ninja Guard’s Moves
The Ninja Guard is a color bound piece that can move one or two steps diagonally. It can leap over a diagonally adjacent friendly piece to land exactly 2 squares away (a two-space diagonal leap). It can capture on any square it lands, and additionally it can can capture an enemy piece that is diagonally adjacent by jumping over it. It can capture two pieces (the first immediately adjacent to it, and the next right after) in its path on a diagonal by jumping over the first one and capturing the second piece on the square it lands. |
The Ninja Guard on c4 can capture all the pieces in the diagram.
It can capture the pawn on a6 by jumping over the knight at b5. It can capture the pawn on b3 by moving to b3 or by jumping over the pawn and landing on a2. It can capture the knight on d5 by moving to d5 or it can capture both the knight and the pawn by jumping over to e6. |
The Extra-mobile sliding pawn
The pawn moves and captures exactly as in orthodox chess except for the following. Normally, when a pawn faces an opposing pawn or an enemy piece, the pawn is blocked. However, the sliding pawn can, under these circumstances only if it is blocked, slide pass the enemy piece or pawn with the same 1-step diagonal movement that it would make when capturing.The Queen Guard
The Queen Guard moves exactly like the King, 1 step orthogonally or diagonally. Ironically, the Queen-Guard despite appearing to be less powerful than the flying bomber, can deliver mate with the help of a king.The Bird’s (Flying Bomber’s) Moves
*The flying bomber's shape resembles a bat, hence the iconographic symbols used. However, the flying bomber is also referred to as the "Bird" - a common nickname given to fighter planes. The choice of name is left to the player.
The flying bomber's odd combination of long-range and short-range moves makes it a deadly weapon against an unsuspecting opponent.
Standard Move:- The flying bomber eliminates an enemy piece by flying over it, and landing on THE empty square immediately after it on the same orthogonal line. It cannot fly over or capture a second piece or land on any square beyond the first empty square.
- The flying bomber can fly along any amount of empty squares (1-9) orthogonally, but not over any friendly pieces. This is identical to the movement of a rook.
Special Move: the Helicopter Landing
This is a special maneuver that enables the bird to fly over the adjacent square, (jumping over, if occupied by friendly piece or eliminating if occupied by enemy piece) and land like a helicopter on a square exactly 2 squares away, capturing if possible on this square. It can capture two pieces in this manner.Essentially, it combines its standard move with that of a two space orthogonal jumper.
This peculiar short-range prowess in more detail:
- The Flying Bomber can fly over one friendly piece adjacent to it (left, right, up or down) and land on an empty square immediately after it. When it flies over an adjacent friendly piece, its range is limited to two squares.
- If an enemy piece is exactly 2 squares away orthogonally and no other piece is in-between, then the flying bomber can capture the usual way by flying over it and landing on the empty square after it. It can also capture by landing on the same square as the enemy.
- If two enemy pieces lie on the same line, the first one adjacent to the flying bomber, and the next two squares away, then it can eliminate both pieces by landing on the square of the second enemy piece. (see diagram 1) It cannot fly over the second enemy piece.
- Similarly, if there was a friendly piece in immediate vicinity of the flying bomber, and an enemy piece right after it, then the bird can fly over the friendly piece and destroy the piece right after by landing on the same square. Here too it cannot fly over beyond the enemy piece as it cannot fly over two pieces.
- The Flying Bomber needs at least one square to fly over for a bombing. e.g. it can destroy any enemy piece in its vicinity (1 square to left, right, up or down) by flying over it and landing on the empty square after it, but if a friendly piece occupies a square immediately after the enemy piece, no capture can be made. (see diag 2)
- It must capture the enemy piece it jumps over. (capturing is not optional).
It is easier to remember the flying bomber moves as a combination of the standard move with the move of the Dabbabah - a leaping move two squares in any orthogonal direction.
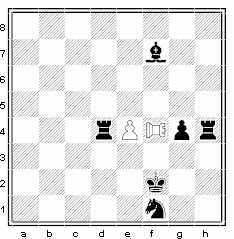 diag 1 (sideways rook rep. flying bomber) |
Diag. 1: The flying bomber on f4 is posing multiple threats to black's pieces.
It is threatening to destroy the black bishop on f7 by moving f4-f8. Using its special 2 square helicopter capability, it is threatening the black rook on d4 by moving f4-d4 (flying over its own piece and bombing/landing on d4). It cannot land on any squares beyond d4. This same short-range prowess gives it the ability to threaten f4-h4, flying over and bombing pawn on g4 and landing/bombing rook on h4. Note that the bomber cannot move to g4 by capturing the pawn, it must eliminate both the pawn and the rook. If there was no rook on h4 then the bomber can just capture the pawn by moving f4-h4. Note that the bird IS giving check to the king because it is exactly 2 squares away, and the bird can land on f2. However the bird is not threatening the knight on f1 since it is more than 2 squares away and there is no empty square beyond it. If the king moves, the knight will not be under attack either. |
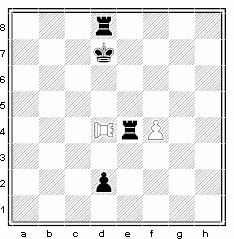 diag 2 (sideways rook rep. flying bomber) |
Diag 2: Here the Flying Bomber is hampered by Black’s Pieces.
It is not checking the king at d7 because there is no empty square behind it (and it is not exactly 2 squares away from it). The rook on d8 is pinned, because moving it would enable the king to be captured. However, the king can simply move away and the rook on d8 is not threatened because there is no empty square beyond it. The rook on e4 is adjacent to the flying bomber and threatening it. But the Flying Bomber cannot do anything because the white pawn occupies f4 and the bomber needs an empty square after its target. If f4 was an empty square, the bomber could capture the rook, and if there was another enemy piece on f4 instead of the white pawn, then the bomber could have captured both pieces. The Flying Bomber does attack the pawn on d2. It can fly d4-d1 OR move d4-d2 to eliminate the pawn. Because it is 2 squares away, the bomber can land on the same square as its target. |
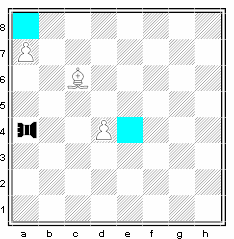 diag 3 (sideways rook rep. flying bomber) |
Diag 3:
Here the black Flying Bomber is threatening white’s pawns at d4 and a7.
However, the white bishop is defending both pawns (colored squares). To make matters worse the bishop is also attacking the bird! |
For simplicity, the above diagrams show a standard 8x8 chessboard and not the actual board space used in the game as below.
 |
The flying bomber at f7 is checking the king at f2 because it can capture by going to f1.
Note that the unused squares do not hinder the movement of any pieces. The Ninja Guard on e4 is attacking the square g2 and so the king cannot go there. The flying bomber is threatening the knight on d7 as well. It can fly over, bomb the knight and land on c7. It can also eliminate the knight by going to d7 since it is exactly 2 squares away. |
Notes on strategy
- The flying bomber and a king cannot pry out an opposing king from its palace nor deliver mate.
- A lone ninja guard and a king can pry the opposing king out if, for white if the ninja guard is colorbound to black (same color as the extreme edge square g7 of black king's palace) or for black the ninja guard is color bound to white (correspond to g2).
- A knight cannot deliver mate but can succeed with the help of the king and with a timely sacrifice divert the opposing king away from the palace.
- A Queen-Guard with the help of a king can mate but cannot always pry the opposing king out of the palace.
|
If you would like to email the chess variant inventor directly: inventor@chess.computerwebservices.net
|

